Call Transfer and Merging
Transfer active calls to other users or merge multiple calls together.
During Active Call
While on an active call, locate the call control options.

Initiate Transfer
Click the 'Connect' button to begin the transfer process.

Select Transfer Destination
Enter the number or select the user you want to transfer the call to.

Complete Transfer
Click 'Transfer' to complete the direct transfer, or 'Call & Hold' for a warm transfer.

For Warm Transfers
Speak with the destination party first, then click 'Patch Call' to connect all parties.

Keypad During Calls
Access the keypad during active calls to navigate automated systems.
During Active Call
While on an active call, locate the keypad button in the call controls.

Open Keypad
Click the keypad icon to display the numeric keypad interface.

Use DTMF Tones
Press any key on the keypad to send DTMF tones to the connected system.

Return To Call View
Click the keypad icon again to hide the keypad and return to the main call view.

Outbound Dialer Features
Make outbound calls with advanced control options.
Open Outbound Dialer
Click the phone or keypad icon to open the outbound dialer.
Enter Number
Use the keypad to enter the phone number you wish to call.

Start Call
Click the green call button to initiate the outbound call.

Mute Call
During the call, click the mute button to disable your microphone temporarily.

Access Keypad
Click the keypad button to send DTMF tones during the call.

End Call
Click the red end call button to hang up when finished.

Advanced Voice Customization
Fine-tune the voice settings for your IVR system.
Access Voice Settings
From your IVR configuration, click the Voice icon in the quick actions.

Select Voice Model
Choose from different voice models including various male and female options.

Select Language & Accent
Choose the language and regional accent for your IVR prompts.

Preview Voice
Use the preview function to hear how your selected voice sounds.

Save Voice Settings
Click 'Save Settings' to apply your customized voice configuration.

Toll-Free vs. Local Numbers
Choose between toll-free and local phone numbers for your business.
Access Number Purchase
Navigate to the 'Buy a number' section in your phone system settings.

Select Number Type
Check the 'Toll Free' box to view toll-free options, or leave it unchecked for local numbers.

For Local Numbers
Select your desired state to view available local numbers with corresponding area codes.

For Toll-Free Numbers
Browse available toll-free options (800, 888, 877, etc.).

Complete Purchase
Select your preferred number and click 'Purchase and Add Numbers'.

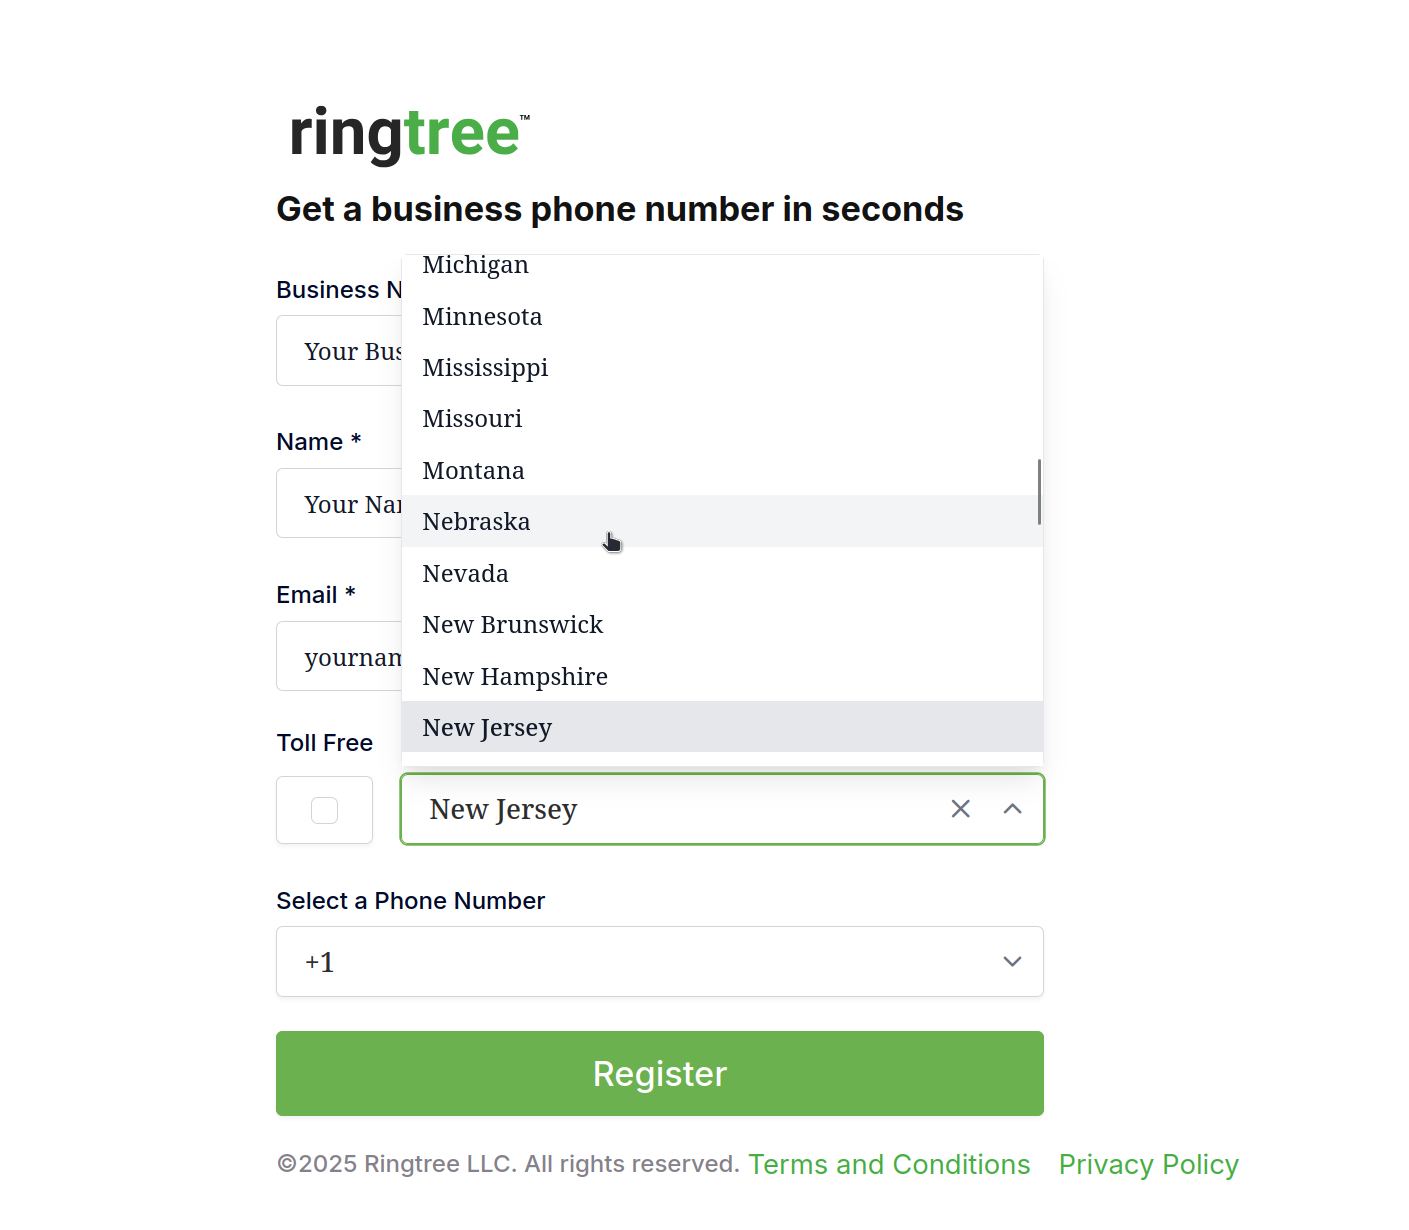
Registration Process
Get started with Ringtree by creating your business account.
Visit Registration Page
Navigate to the registration page and enter your business name.

Enter Personal Information
Fill in your name and email address to create your account.

Choose Phone Number
Select either a toll-free number or choose a state for a local number.
Complete Registration
Click 'Register' to create your account and access your new business phone system.

Login Process
Access your Ringtree account securely with email authentication.
Visit Login Page
Navigate to the login page from the Ringtree homepage.

Enter Email
Enter your registered email address and click 'Login'.

Check Email
Check your inbox for a secure login link from Ringtree.

Access Dashboard
Click the link in your email to be automatically logged in to your dashboard.

Call History
View and manage your incoming and outgoing call records.
Access Call History
From your dashboard, navigate to the Calls section to view your call history.

Review Call Details
View call direction, caller information, date/time, and duration.

Search and Filter
Use the search function to find specific calls or filter by date range.

Voicemail Management
Access and manage your voicemail messages.
Access Voicemail
From your dashboard, navigate to the Voicemail section.

Listen to Messages
Click on any message to play the recording and view the transcription.

Message Management
Mark messages as read, delete unwanted messages, or download for later reference.

Making Calls
Make outbound calls directly from your web browser.
Open Dialer
Click the keypad icon in your dashboard to open the web dialer.
Enter Number
Use the keypad to input the phone number or select from contacts.

Initiate Call
Click the green call button to start the call.

Use Call Controls
During the call, use the mute, keypad, or transfer buttons as needed.

Receiving Calls
Handle incoming calls through your Ringtree system.
Incoming Call Alert
When a call comes in, you'll see a notification with caller information.

Accept or Decline
Click 'Answer' to accept the call or 'Decline' to send to voicemail.

Manage Active Call
Use call controls to mute, place on hold, or transfer the call.

Phone Numbers
Manage your business phone numbers.
View Current Numbers
Go to the admin section and select 'Phone Numbers' to see your current numbers.

Purchase New Number
Click 'Buy a number' button and select your preferred area code or toll-free option.

Complete Purchase
Review pricing and click 'Purchase and Add Numbers' to confirm.

Call Forwarding
Set up call forwarding to receive calls on your preferred device.
Access Forwarding Settings
Navigate to Settings and find the 'Forwards To' section.

Edit Forwarding
Click 'Edit' and enter the phone number to forward calls to.

Save Settings
Click 'Submit' to save your forwarding settings.

Business Hours
Configure your operating hours for call routing.
Access Business Hours
Go to Call Routing settings to find the Business Hours section.

Set Working Hours
Select your start and end times using the time picker.

Select Working Days
Check the boxes for each day your business operates.

IVR Configurations
Create and manage your virtual receptionist settings.
Access IVR Management
Navigate to Admin > Manage > IVR to access your configurations.

Create New Configuration
Click 'Add New Configuration' to create a new IVR flow.

Name Your Configuration
Enter a descriptive name and initial greeting for your IVR system.

Save Configuration
Click 'Create IVR Menu' to save your new configuration.

Menu Creation & Management
Build your IVR menu structure for caller interactions.
Select IVR Configuration
Choose the IVR configuration you want to edit from the list.

Add Menu Greeting
Enter the greeting message callers will hear or upload an audio file.

Configure Keypad
Click 'Configure Keypad' to set up menu options for each number.

Set Key Actions
For each key, select an action (transfer to user, team, voicemail, or submenu).

Save Menu Settings
Click 'Save Changes' to apply your menu configuration.

Voice Settings
Customize the voice used in your IVR system.
Access Voice Settings
From your IVR configuration, click the 'Voice' icon in the quick actions.

Select Voice
Choose from available voice options (male/female).

Select Language
Choose the language for your IVR system.

Save Voice Settings
Click 'Save Settings' to apply your voice configuration.

Routing Options
Configure where calls go based on menu selections.
Access Menu Keypad
Open the keypad configuration for your selected menu.

Select Digit Key
Click the number you want to configure (1-9, *, #).

Choose Routing Action
Select user, team, voicemail, or submenu as the destination.

Select Specific Destination
Choose the specific user, team, or submenu from the dropdown.

Save Routing Settings
Click 'Save Changes' to apply your routing configuration.

AI Assistant Options
Set up AI-powered call handling within your IVR.
Select Assistant Menu
When creating or editing a menu, select 'Automated AI Assistant' as the type.

Set Greeting
Enter the initial greeting your AI assistant will use.

Configure Knowledge Base
Enter information for the AI to reference when answering caller questions.

Save Assistant Settings
Click 'Save Changes' to apply your AI assistant configuration.

Team Creation
Create teams to organize your users for call routing.
Access Team Management
Navigate to Admin > Manage > Teams to view your teams.

Create New Team
Click 'Create Team' button to start the process.

Enter Team Details
Provide a name, description, and optional phone extension for the team.

Save Team
Click 'Create Team' to finalize and create your new team.

Team Members
Add and manage users within your teams.
Select Team
Click on the team you want to manage from the teams list.

Add Team Member
Use the dropdown to select a user to add to the team.

Manage Existing Members
View current team members and click on any user to edit their settings.

Remove Team Member
When editing a user, click 'Remove from team' if needed.

Team-specific Settings
Configure settings unique to each team.
Edit Team Profile
From the team management page, select a team to edit its profile.

Set Team Voicemail
Configure a team-specific voicemail greeting using text or audio.

Save Team Settings
Click 'Save Edits' to apply your team configuration changes.

User Profiles
Create and manage user accounts for your phone system.
Access User Management
Navigate to Admin > Manage > Users to view all users.

View User Details
Click on any user to view their full profile information.

Edit User Information
Update name, email, forwarding number, or extension as needed.

Save User Profile
Click 'Save Changes' to apply your edits to the user profile.

User Invitations
Invite new team members to join your Ringtree system.
Access User Invitations
From the Users page, find the 'Invite New Users' section.

Fill Invitation Details
Enter the name, email, phone, extension, and team assignment.

Send Invitation
Click 'Send Invitation' to email the user with access instructions.

Confirmation
You'll see a confirmation when the invitation has been sent successfully.

Call Flow Configuration
Set up how calls are handled based on business hours.
Access Call Routing
Navigate to Admin > Manage > Call Routing to configure flow.

Select Phone Number
Choose which phone number you want to configure routing for.

Configure Business Hours Routing
Set how calls should be handled during business hours (IVR, team, user, voicemail).

Configure After Hours Routing
Set how calls should be handled outside business hours.

Save Routing Configuration
Click 'Save' to apply your call routing settings.

Email Notification Preferences
Configure email notifications for voicemail and system alerts.
Access Email Settings
Navigate to Settings > Misc Settings to configure email preferences.

Set Transcription Email
Enter the email address to receive voicemail transcriptions.

Save Email Preferences
Click 'Submit' to save your email notification settings.

Number Porting
Transfer your existing phone numbers to Ringtree.
Start Porting Process
Navigate to the Number Porting section and complete the authorization form.

Enter Personal Information
Fill in your name, business name, and contact details.

Enter Service Address
Provide the physical address associated with your phone numbers.

List Phone Numbers
Enter the numbers you want to port and their current service providers.

Upload Documentation
Upload a recent phone bill showing the numbers to be ported.

Sign and Submit
Provide your signature and submit the porting request.
